
Over the past few months I’ve been learning a bit of Gradle and Kotlin for a new project at work.
At work we use an internal code repository that doesn’t have any sort of continuous integration or automated build process, so it’s up to us to manually run tests on our local machines. Unfortunately, we often forget to do this, and bugs can slip by unnoticed.
When working on personal projects I try to learn from what we do at work (both the good and the bad) and I strive to always set up test automation. In most cases, this means using Gitlab pipelines to build and test every single commit. This article describes how I set that up for Kotlin.
What are Gitlab Pipelines?
The idea behind Gitlab pipelines is straightforward: define a set of steps to build and test your code, store those steps in a file in your repository, use Docker containers to run the defined steps, and finally, report back the results. It’s a simple concept but it’s very powerful.
The following screenshot shows a section of the massive build pipeline used to build and test Gitlab’s own codebase.
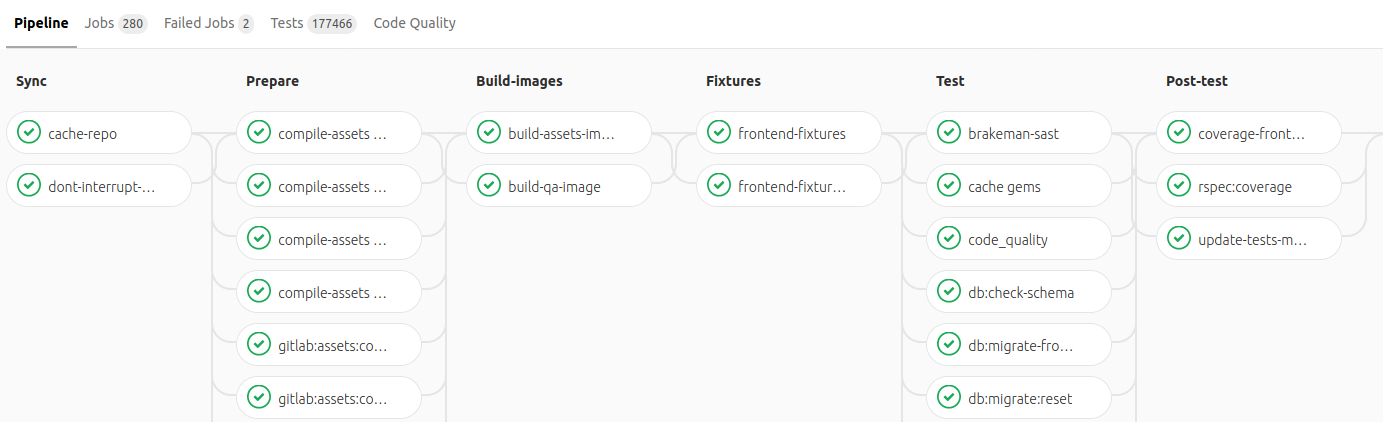
Note: The Gitlab software is open-source and hosted on gitlab.com. Gitlab is quite literally building itself using these pipelines.
By looking at the pipeline, you can get an idea of all the things it is doing. Compiling all kinds of assets, running tests, generating coverage reports, and so on. There are hundreds of steps involved, spread across multiple stages. They’re all automated and they all run for every single commit.
How can this help you?
The flexibility of pipelines gives you endless possibilities. You can define what Docker container to use, what stages you want, what steps fit into each stage, and what commands to run for each stage. There are all sorts of things you can automate. For example:
- Test your code.
- Run static code analysis to find anti-patterns.
- Run style checkers to find style errors.
- Run vulnerability scans.
- Check for out-of-date dependencies.
- Validate commit messages to ensure they follow a given standard.
- Run different steps on different branches/tags (e.g. Run a special publication script only on the master branch).
- Build and host a static site (documentation).
- Run tests against multiple database engines to ensure compatibility.
There are many others. You can read the docs for inspiration or take a look at the examples page.
Applying it to Kotlin
Since starting to use Kotlin and Gradle at work I’ve started using it for some of my personal projects as well. Figuring out a pipeline I can use in Gitlab for my Kotlin code was high on my to-do list.
For the purposes of this article, I created a demo project to demonstrate the solution I came up with. You can find it here: Kotlin Build Pipeline
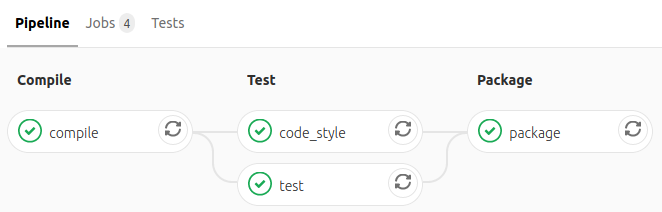
At a high level, this is what it does.
The first stage is to compile the code. This stage has a single step that uses Gradle to compile.
The second stage is to test the code. I split this into two types:
- Run Ktlint to find style errors — a failure here will be interpreted as a warning and the pipeline will proceed.
- Run all the unit tests defined in the project — a failure here means the pipeline fails.
Finally, build a “fat jar” file with all the dependencies to be published.
To set this up, I just need to create the .gitlab-ci.yml file in the root of the repository with the right instructions. Gitlab handles the rest.
image: openjdk:11-jdk

stages:
  - compile
  - test
  - package

before_script:
  - export GRADLE_USER_HOME=`pwd`/.gradle

cache:
  paths:
    - .gradle/wrapper
    - .gradle/caches

compile:
  stage: compile
  script:
    - ./gradlew assemble

test:
  stage: test
  script:
    - ./gradlew test --stacktrace

code_style:
  stage: test
  script:
    - ./gradlew ktlint
  artifacts:
    paths:
      - build/ktlint.xml
    expire_in: 1 day
  allow_failure: true

package:
  stage: package
  script:
    - ./gradlew shadowJar
  artifacts:
    paths:
      - build/libs/*.jar
    expire_in: 1 day
So what is this file actually doing?
image: The first line is to define which Docker container to use. In this case, I’m using a container with Java JDK 11 installed. The demo application is being built to target Java version 11 but this can be tweaked to target a different version of Java.stages: The next section defines the stages of the build process. For a simple project I define three stages: compile, test, and package.before_script&cache: Thebefore_scriptsection defines commands that get run before each and every step. In this case I am setting theGRADLE_USER_HOMEsystem variable to the correct path. This complements the followingcachesection to store the.gradle/folder in the shared cache between steps. These steps are not necessary but they make the pipeline run a little faster.compile: Thecompilesection is the first actual build step. It belongs to thecompilestage and its purpose is to compile the code and ensure there are no build errors. This step runs thegradle assemblecommand.test: As the name suggests, the purpose of thetestsection is to run tests. This step runs thegradle testcommand to run all the tests. In this project, the tests were created using the JUnit5 framework.code_style: This section defines how to check the code for code-style errors. I useKtlintfor this because it is so easy to set up and use.Ktlintis configured in thebuild.gradlefile and I made the following two tweaks to the default configuration.- Generate an output file with the results at
build/ktlint.xml - Allow wildcard imports. By default
Ktlintwill flag wildcard imports as an error. However, this clashes with the default behaviour of my IDE (IntelliJ), which will use wildcard imports where possible. This is a controversial topic but I chose to allow them. You can re-enable this rule by updating the build.gradle file and remove the flag for disabled rules the Ktlint settings:"--disabled_rules=no-wildcard-imports"
- Generate an output file with the results at
package: This is the final step of the build. It’s part of thepackagestage and its purpose is to compile the project into a single “fat jar” and store it as an artifact for later use. This step uses the Shadow Jar Gradle plugin to generate the jar file. If it makes sense for your project, you can update this file to only run this step on certain branches (e.g. only on master) to avoid generating build artifacts for code that’s still in development.
If you want to learn more about setting up build pipelines with this file you can read more in the documentation.
Conclusion
In this article, I focused on building and testing Kotlin code, but Gitlab pipeline functionality is not limited to Kotlin or Gradle. There are plenty of other creative ways you can use pipelines for all kinds of languages.
I hope this helped you set up build automation for your own personal or professional projects. Or at least got you thinking about it.
If for some reason you’re dead-set on using Github instead, Gitlab even offers the option to run pipelines for external projects hosted on Github. Read more about that in the documentation.
blockquote
Thank you for reading. What will you build?
Resources
Also on Medium